Smart Field Design
Introduction
A Smart Field is a data dictionary item that has a Business Function attached. The Business Function includes a Named Mapping that maps the source for each parameter of the Business Function data structure.Smart Fields can be used for deriving column headings or to populate a value using a calculation. For example, on a financial report you may have a column for the total of the period activity by account. The Smart Field column heading could dynamically print the name of the month, dependant on the period parameters passed in through a processing option template. The column data will represent a value based on a calculation, or a Named Event Rule (NER).
Another example would be to create a Smart Field for the calculation of the Quarter To Date amount. Consider a twelve month fiscal year that begins with the month of January. If the report is being ran for period one (January), the Quarter To Date would be the total of Period One only (January). If the report is being ran for period two (February), the Quarter to Date would be the total of Period One and Period Two (January and February) etc. This calculation will be performed by the Business Function NER for each row of data fetched into the report section.
Because Smart Fields are reusable objects, the creation of the Quarter To Date Smart Field eliminates the need for extensive event rules in each report that requires the Quarter To Date total.
Steps to Create a Smart Field
We will proceed with the creation of a Quarter To Date scenario.The basic components of a smart field are:
- A data dictionary item for a user prompt. If required, this field would serve as a user prompt at runtime. For example, you may want to indicate a quarter such as 1, 2, 3 or 4. A user prompt is not always required however, and in our example, we will determine the quarter based on the period number passed in the processing option template.
- A data structure. This would include the user prompt (above), and any other data items required in order to pass the fields from the business view that would be needed in order to perform the calculation.
- A named mapping. This will map the source for each parameter in the data structure.
- A business function or named event rule. Business functions are written in C language, while named event rules are written in scripting language using the Enterprise One toolset. In our example, we will use a named event rule to write the logic required to calculate the Quarter To Date amount.
- A smart field data dictionary item (Group K). This data dictionary item is attached to the report, and automatically has the data structure, named mapping and named event rules attached.
Create the Data Dictionary Item for use as a prompt
This item must be a standard data dictionary item using a D glossary group. The data item serves as a prompt for the report creator. When using the Quarter To Date smart field, the report creator will enter a period number value in the processing option template which will be used to determine the value of the quarter to date.When you either create a new, or copy and modify an existing data item to be used as a user prompt, be sure to enter the glossary text. The text should explain the purpose of the data item and will appear on the Smart Field Parameters form in Report Design.
Steps To Create the Data Dictionary Item
1. Create a new project folder and enter Smart Fields as the description. Click the Add button from the tool bar. The Add Object form appears.2. Choose the Data Item radio button and click on the OK button. When the pop up window appears, indicate Yes if you are creating a glossary data item such as an error message, otherwise, indicate No.
3. The following is an example of the required fields to create a data dictionary item, glossary group D, for use as a prompt.

4. Click the Item Glossary tab and enter text as in the following example. This is the text that appears on the Smart Field Parameters form in Report Design to tell the report creator what the valid input values are.

Defining the Data Structure
The second component required for a Smart Field is a data structure. A data structure is a list of parameters used to pass values between your report and the database tables. It contains all data items required to complete the function of the Smart Field. The Quarter To Date Smart Field requires the twelve financial periods for use in calculating the quarter. It also requires input from a processing option for period number and fiscal year, in addition to a return value to hold the amount calculated for the quarterly total.When actually creating the report, all data items in the Data Structure must reside in the same business view.
Steps to create the Data Structure
1. While in OMW, start by focusing on the project folder titled Smart Fields. Click the Add button from the tool bar. The Add Object form appears.2. Choose the Data Structure radio button and click OK. Complete the Object Header form as follows. Leave the default radio button on Regular Data Structure. Click OK.
Object Name : D5683001
Description : Quarter to Date
Product Code : 56
Project System Code : 56
Object Use : 360
3. From the Design Tools Tab, start the Data Structure Design. From the Data Dictionary browser on the right, find the alias PN and drag and drop the data item to the Structure Members window on the left. Click on the Required Field, and place a right pointing arrow in the Input/Output column. Repeat the steps for alias FY.
4. For the return value, use alias AA. Drag from the Data Dictionary browser to the left, do not click on the Required Field, and place a left pointing arrow in the Input/Output column. Double click on the Structure Member Name field and rename to mnQuarterlyAmountField.
5. Search now for alias AN* in the Data Dictionary browser. You will see the twelve periods AN01 – AN12. Drag each of them in to the Structure Members window, and place a right pointing arrow in the Input/Output column. Your final Data Structure should look like the following:

Defining Named Mapping
The Named Mapping is a part of the data structure and is used only for Smart Fields. The Named Mapping defines the source for each parameter (or data item) of the Data Structure. For example, source values are determined for the prompts, tables, processing options and return values. Examples of the different sources for Named Mapping are:- Literal: A literal is used to assign a specific value to the data item that is not included in the business view.
- Prompt: Specify the data item to be used as the prompt, if required. In Report Design, the report creator will be prompted to enter the appropriate value.
- Table: Specify the data items that originate from a table. Browse to locate the table name and associate the data item in the data structure wit a data item from the table.
- Data Dictionary Item: Select this option if you will need to pass values from a processing option into your data structure.
- System Value: You would select this option of you wanted today's date (system date) etc. System values are stored in the F98VAR table.
Steps To Complete the Named Mapping
1. From the same form (Design Tools tab) where you called the Data Structure design tool, another option exists for you to access Named Mapping (see below). Click on this option.
2. Click on the Add button to the right of the Named Mapping List. Enter the name M5683001 and click on the OK button. This will add our custom mapping to the list available for use by our data structure.
3. Highlight the first data item in the Structure Member (mnPeriodNoGeneralLedger). Change the Data Item Origin to Data Dictionary Item. This will enable the Optional selections where you will choose Processing Option & Report Interconnect. Click on the Browse button, search for alias PN and select. Finally, click on the Required Field. This will 'map' the value the user enters in to the processing option period number field to this data item in the data structure.
4. Repeat the steps from step three above for the second data item (szFiscalYear9), selecting alias FYOW instead of PN. This will 'map' the value the user enters in to the processing option fiscal year field to this data item in the data structure.
5. Highlight the third data item in the Structure Member (mnQuarterlyAmount). Select the box Return Value towards the bottom of the form. Notice the Required box will automatically be checked as well. This will return the value that the Smart Field calculates to this data item in the data structure. Once again, notice the directional arrow for this item is to the left, where all other arrows are to the right.
6. The following twelve data items in the Structure Member need to be mapped to the appropriate column in the table F0902 where the posted balances are stored. Remember you have a data item for each of the twelve periods that will be required in order to calculate the Quarter to Date amount. Focus on the fourth data item in the Structure Member (AN01). Change the Data Item Origin to Table, then click on the Required box towards the bottom of the form. Click on the Browse button in order to Select a Table from a list.
7. The Object Name to search for is F0902 (Account Balances File). Click on the Find button and then Next. Select AN01 (Amount – Net Posting 01) and then click the Finish button. This will 'map' the value in period 01 (AN01) from the F0902 table into the AN01 data item in the Data Structure. Repeat this step for items AN02-AN12 to map period two to AN02, period three to AN03 etc.
Your final Named Mapping should look like the following:

Steps to Create Named Event Rules
The next step in the Quarter to Date scenario is to create a Named Event Rule to perform the Smart Field's calculations.We have created a Data Structure D5683001 which contains data items for all of the fields required in the calculation. We have associated a Named Mapping M5683001 which maps each parameter in the data structure to the source input/output.
1. From OMW, focus on the project folder titled Smart Fields. Click on the Add button. From the Add Object Form, select the Business Function radio button and click OK. Complete the following information:
Object Name : N5683001
Description : Quarter To Date
Product Code : 56
Product System Code : 56
Object Use : Blank
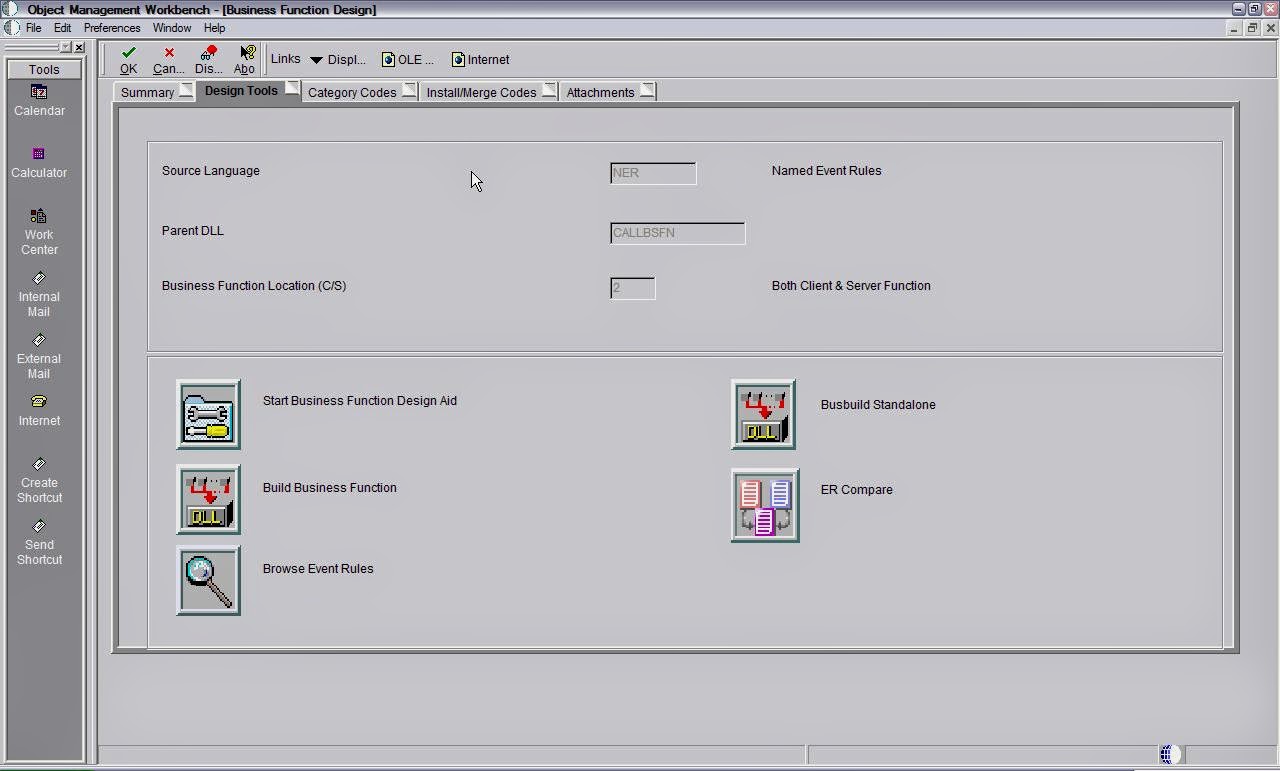
Source Language : NER
Function Location : Client/Server
2. From the Design Tools Tab, Start The Business Function Design Aid. Change the Parent DLL to CALLBSFN. Name the Function Name field and Description as per the following illustration, and allow all other fields to default values. Click OK.

Your Named Mapping information should appear as per the following illustration:
3. Once again, Start Business Function Design Aid. Focus on the row in the grid and use the Row Exit to Parameters. A Data Structure look-up form appears. Search for Template Name D5683001 and click Find. When you Select the template, notice that it now appears in the Template Name field. You have now associated your data structure to this NER.
4. Now use the Form exit to Edit. The Named Event Rules Design window will appear where you can write the logic to accumulate the Quarter To Date totals.

You will recall that the Named Mapping we defined earlier has mapped the value the user enters in to the processing option period number field to the business function field (BF prefix) mnPeriodNoGeneralLedger. We can now use this business function field to set the criteria for our 'If' statements.
The final event rule logic will look like the following:

Click OK, which will take you to the Design Tools Tab again where you entered Business Function Design. Notice that there is a Browse Event Rules button which allows you to look at the event rules without actually going in to the design session itself. Click on Browse Event Rules now to see the following:

5. After you code a business function, it must be 'built' in order for EnterpriseOne to recognize it. The Business Function Builder will compile the code which creates the business function object, and then links the object to a dynamic link library (DLL). Note: Visual C++ must be installed in order to use the Build Business Function feature.
Click now on the Build Business Function button below the Start Business Function Design Aid button. A Build Output form displays the result of the build.

Steps to Create a Data Dictionary Smart Field Item
The last component required for a smart field is a data dictionary smart field item. This data item defines the business function or named event rule and named mapping associated with the smart field, and ties it all together. Note: Before you begin, check in the data structure before creating the smart field data dictionary item so that the system can locate the named mapping.
1. While in OMW, focus on the project folder titled Smart Fields. Click the Add button from the tool bar. The Add Object form appears.
2. Choose the Data Item radio button and click on the OK button. When the pop up window appears, click on the No button. Name the item as follows:

3. From the Form menu, select Smart Field to launch the Smart Field criteria form.
4. Associate the QuarterlyAmount business function N5683001 (the named event rule that you created) with the Smart Field. Use the visual assist on the Business Function column, and search using the QBE over the column Source Module.
5. In the Event Name column, use the visual assist to indicate from which event the smart field can be called. This Smart Field will be used in financial reporting which will require that a tabular section be used. Therefore, the column inclusion would be a good choice.
6. In the Named Mapping column, enter the M5683001 to associate the named mapping that you created. The Smart Field criteria form will look like the following:

7. As you did with the user prompt data dictionary item, enter help text using the Item Glossary tab for this smart field item.
In Summary, we now have the following data items:
- Data Structure D5683001
- Named Mapping M5683001
- Named Event Rule N5683001
- Data Dictionary Smart Field, 56QTRAMT, which ties everything together.
Smart Field Template Definition and Activation


This Smart Field will now be available to you from within your RDA session. With your focus on a tabular section, use the Column pull-down menu -> column -> create -> Smart Field. The column will be created for you complete with the named mapping parameters. Before the Smart Field column is created, you must have both a valid processing option template attached to the report, in addition to a business view, that contains the required fields for mapping,
Directed Exercise: Setting up a Custom Smart Field
Steps to Complete the Exercise
Report R5683002: Quarterly Reporting
1. Focus on the project folder titled Smart Fields, and add a new Batch Application, with values as follows:
Object Name : R5683002
Description : Quarterly Reporting
Product Code : 56
Project System Code : 83
Object Use : 161
2. Start Report Design Aid. Select the Page Header Section and Tabular Section, and close out of the Navigation Assistant. Choose not to create a version at this time, as both the report font and print orientation need to be changed. These changes will not push down to any existing versions.
3. Using the section pull-down menu, select Business View. Search for object V8300001, click Find and then Select in order to attach the business view to the tabular section.
4. Use the report pull-down menu to select a processing option template. The template required is T83PO. Attach it to your report. Also use the file pull-down menu to go to Print Set Up and change the print orientation from landscape to portrait. Go to Report Properties and change the font from size 7 to 9.
5. Use your column pull-down menu to create the first column. Column -> Create -> Row Description Column. The next column we need is the Smart Field business function we have created in order to accumulate quarterly amounts. Column -> Create -> Smart Field. Because you modified the Smart Field Template S09001 in the proceeding steps, you now have the custom Smart Field available as an insert. Highlight Quarterly Amount. Click Next.
6. Follow the steps as defined in the Working with a Conditional Section in order to set the parameters for the Smart Field Column. When you have completed the column specs, go to the Column Inclusion event rules (focus on column variable, right mouse click, event rules) and drill down to the business function. You will see that the parameters have been automatically mapped for you!

7. Using the section pull-down menu, choose Data Sequencing. You will recall from your knowledge of tabular sections, that sequencing and level breaking are essential for the creation of rows. In this instance we need company, object and subsidiary as level break objects.
8. Using the section pull-down menu, choose Data Selection and complete as per the following:

9. Access the tabular section properties (either double click, or right mouse click to properties) and go to the Financial tab. Set the values as per the following:

10. Before adding a version, we should have a date title on the page header so that we know how many periods are contained in the quarterly amount. Review the steps required to set up a date title from within the chapter on Working with a Conditional Section. In this instance, we will use Date Title Type = S to give us the wording 'For the Period Ending'. Your page header Do Section event rules should look like the following:

11. Add your version now, ensuring that you enter a 2 in the prompting options. Run the version for period number 5, fiscal year 5 and then again for period number 6, fiscal year 5. Open UTB and validate your quarterly amounts. Your report should look like the following 2 PDFs.

Period 5, Fiscal Year 5

Period 6, Fiscal Year 5
I am not getting Event Name in smart field criteria?
ReplyDelete